Tuesday, December 9, 2008

Painting Away Color QZ


Painting Away Color Tutorial


step1: Open the image you would like to work on. Apple+J.

step2: Click on the brush tool in the Options Bar, switch the Blend Mode to color. Change your foreground color to black.

step3: From the brushes palette, choose a medium sized, soft-edged (o% Hardness) brushes.

step4: Start painting. As you paint, the color will disappear leaving your image in grayscale.

Wednesday, December 3, 2008

Gold Chrome Tutorial

Step1 : Type your text. Put a selection around your text.

Step2 : Go under the Select menu and choose Save Selection. Click OK. Deselect your text. Delete your type layer.

Step3 : Go to the Channels palette, Click on Alpha 1. Go under the filter menu, under Blur, choose Gaussian Blur. Enter 1 pixel.

Step4 : Return to the layers palette and click once on the background layer. Go under the filter menu, under Render, and choose Lighting Effect. Under the texture Channel option, Choose Alpha 1. Click OK.

Step5 : Go under the image menu, under Adjustments Curves. Create a curve. (Input 186. Output 64) Click OK.

Step :Go under the select menu and choose load selection. Choose Alpha 1 from the Channel pop up menu. Click OK. Go under the Select menu, under Modify and choose Expand. Enter 3 pixels. Click OK.

Step7 : Press Shift +Apple + J. Click on the background layer Press Apple + A, then press delete. Deselect. Click on your text layer, Choose drop shadow from the layer styles . Change the blend mode to Overlay then click the color swatch and use the following.

R= 208
G=165
B=16
CLICK OK !!!!!!

Shadow In Motion Tutorial


Step1 : Tap the letter "d" to change the foreground color to black. Hold down the option key and tap the delete key. Type your text using a medium gray color (#666666).

Step2 : Duplicate your type layer by using the Apple + J short. Rasterize your layer.

Step3 : Go under the filter menu, under Pixelate, choose fragment. Run this filter two more time by using the Apple + F shortcut.

Step4 :Press Apple + T. In the options bar change the width + height to 130%.

Step5 : Click on your original type layer and rasterize it. click on the top layer and press Apple + E to merrge the 2 layers.

Step6 : To colorize your type, press Apple + U to bring up the Hue/Saturation. Click the colorize checkbox and make and make the Hue slider to the color you'd like.

Shadow In Motion Tutorial

Photoshop Shortcuts

Apple + U - Hue and Saturation

Apple + T - Free Transformation

Option + Delete - Changes color of the image to your foreground

Apple + J -Duplicate Layer

Apple + E - Merge

Apple + F - Run the last filter

Apple+Z = Undo

Apple+X = Cut

Apple+C = Copy

Apple+V = Paste

Apple+N = New Document

Apple+A = Select All

B = Brush Tool

Apple+S = Save

Apple+D = Deselect

Ctrl + click layer = Rasterize layer

Apple + Click Layer = put selection around your text

X = Switch your foreground to whatever your background color is

T = Type Tool

D = Foreground color black Background color white

Wednesday, November 12, 2008

Holiday Card Project

What is the Holiday Card Project?
The purpose of the Holiday Card Project is to create holiday card for people who are hospitalized during the holiday season. The idea behind the project is to simply try to bring a little cheer to those who are undergoing hospital stay.

Exactly who receives the cards?The cards will be distributed to both U.S and international hospitals. The card will be delivered in-person by a representative. The patients who receive the cards age in range from children to seniors and have illness or injuries that vary from mild to terminal.

What should I write in a card?
Be as creative as you'd like. Just remember, the degree of illness for patients will vary, so it is important to be cheerful. Some suggested greeting include" Hope you're feeling better","Thinking of you",or"Have a nice day". "Try to stay away from "Get well soon" as it might not be appropriate for all patients.

Remember to include a message of "Happy Holidays".

Will the patients know who sent the cards?
The only way a patient will know who the cared is from is if you sign your name. If you would like to send your card anonymously, you may.

Can I send more than one card?
Absolutely! However, remember that quality is better than quantity. Sending one quality card that you put time and effort into is better
than sending two cards that were thrown together.

Is there a specific size or medium card?
There is no specific size for the card. Use your best judgement. You can design a decorate cards by drawing , coloring or painting. You can use glitter, construction, paper, cardboard, markers, crayons, colored pencils, ribbons, etc. , to make your card special you can also design your card using Photoshop. In Photoshop please use 4*6 of 5*7 for your dimensions.

African proverb#7

An intelligent enemy is better than a stupid friend.

I think this proverb means that an intelligent enemy is better than a stupid friend because that intelligent enemy maybe an enemy but you may learn some things out of that person. I think this also mean that an intelligent friend can do something that maybe is mean to that person but the stupid friend can know that his/her enemy will always know that, that enemy can teach you something. this proverb mean to me that you may have an intelligent enemy but is also smart and that person can really know lots of things.

Tuesday, October 7, 2008

Homework #1

Find an example of a form of advertisement (brochure, flyer, magazine ads) that was most likely made in Photoshop. Pay close attention to details such as Photoshop filters, warped text and layer styles.

Due: Tuesday. Oct.14 ,2008

Tuesday, September 30, 2008

Semi-Transparent Type Tutorial


Step1: Type you text
Step2: Put a selection around your text. Hide your type layer. Click on the background layer.
Step3: Press Apple+J. Click on your layer styles and choose drop shadow. Click directly on the words inner shadow. Next click on the words inner glow click OK.
Step4: Drag your text layer into the trash.
Step5: Click on your background layer Hold down Apple key+L to brighten your background image.

sEMi-Transparent Type Tutorial

The Matrix Shadow Effect Tutorial


Step1: Press "D" on your keyboard to set the background swatch with black. Press the letter "X" to swap swatches. Hold down the apple key and press delete.

Step2: Type your text. Hold down the control key and click on the text layer. Choose rasterize.

Step3: Make a duplicate of your rasterized layer.
Go under the filter menu, under blur, choose motion blur. When the dialog box appears set the angle to 0º, and increase the distance of the blur to 39 pixels. Click OK.

Step4: Make a duplicate of your original rasterized layer. Go under the filter menu, under blur, and choose Motion Blur. When the dialog box appears, set the Angle to 90º and the distance of blur to 80 pixels Click OK.

Wednesday, September 24, 2008

gel type


Step 1:
Choose your font size and color

Step 2:
Type your word

Step 3:
In your layers palette, apple+ click your type layer to put the marching ants around the text ,then create a new layer.

Step 4:
Go under the select menu, under modify, and choose contract . When the contract dialog appears enter 2 parts option + delete to fill your contract selection.

Step 5:
Deselect by pressing Apple + D. Duplicate this layer by dragging it to the new layer icon, then go under the filter menu, under blur and choose Gaussian blur when the dialog box appears enter 3 pixels and click OK.

Step 6:
Choose bevel and emboss from the layer styles pop-up menu at the bottom of the layers palette .
---->Style emboss
---->Depth 100
---->Size 12
---->Highlight Opacity 100%
---->Shadow Mode : Color Dodge
---->Shadow Mode Opacity:40 %
---->Color box: Change from black to white
Click OK

Step 7:
In the layers palette click on the eye icon beside the background layer to hide it then choose merge visible from the palettes drop down menu. Choose Drop shadow from the styles menu and click OK.
Check background layer by clicking the eye so it is visible.

gel type

Carved Wood Type Tutorial


Step 1:
Click on the gradient tool. In the options bar, click on the gradient thumbnail to bring up the gradient editor.
When it appears double click on the left color stop. When the color picker appears, click on the custom button,
then choose Pantone 722, and click OK. Double click on the right color stop, this time choose Pantone 732,
Click OK!

Step 2:
In the options bar, click on the radial gradient icon. Using this tool-and-gradient from the center to the top of
the background layer. Go under the filter menu, under noise and choose add noise. Enter 12% for amount choose
Gaussian and check Monochronic, Click OK.

Step 3:
Then go under the filter menu under Blur and choose Motion Blur, Enter 33º for angle and 10 for distance. Click OK
now go under the filter menu, under sharpen, and choose Unsharp Mask. Enter 500% for amount, 9.0 pixels for
Radius and 1 for threshold. Then click Ok.

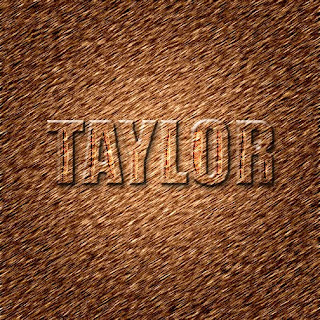
Step4:Type you text, go under the layer menu, under rasterize , and choose Type layer into a regular image layer. Now, under Brush Stroke. Choose Sprayed Strokes. Type 12 for stroke length, 7 for radius, and right diagonal for direction. click OK.

Step5: Click the magic wand tool. Click once in your first letter of your word. Then go under the select menu and choose Similar to select the rest of the letter. Under the Select menu, choose inverse. Now press delete to remove the little Chunk of white space around the letter created by the brushed stroke filter.

Step6: Go under the select menu and choose inverse. Drag your text layer into the trash to delete it. Press Apple+J to put the selected background area up on its own layers palette, click once on the background layer. Press Apple+a, the press delete. Press Apple+D to deselect.

Step7: Click on your text layer. choose bevel and emboss from the layers styles menu at the bottom of the layer palette. When the dialog box appears, increase the depth to 400% and decrease the size to 4. Increase the highlight opacity to 90%. From the left side of the layer styles dialog box click on the word drop shadow to bring up its options. Increase the size to 8, lower the opacity to 50% and click OK.

Step8: Choose the lasso tool. Make a thin selection in the center of each letter. Remember to hold down the shift key. Press Apple+C to copy. Add anew layer press Apple+V to paste Change the layer mode from Normal to Color Burn.

Step9: Duplicate your new layer. Now duplicate your duplicated layer. Color burn to screen. Press the right arrow key twice the down arrow key once.

Tuesday, September 23, 2008

African Proverb #6

It is better to be loved than feared.

I think this means that it's better to be loved instead of feared because loved people can do a lot for others and feared people are frustrated and is never around to have fun and communicate with others. I think this also means that it is also important to be loved instead of feared because someone out their loves every one, they probably think it is not true, but it is. Feared children or adults can't probably get things of there chest because their so worried all the time.

It is better to be loved than feared means to me that feared can cause many problems in he/she life and they aren't able to explain it because they can be afraid to tell all about want's on their mind. Loved people can be very happy and they are the ones who can share the things that they are having problems with. This is used in our everyday life because I sometime or maybe all the time I see people on the streets and a few of them has fear written all over their face and then you see the loved ones who communicate all the time. That's what this african proverb means to me.

Thursday, September 18, 2008

Extra Money

If you had a extra 100,000 dollars to give away you can not spend it on yourself, what would you do with the money?

I would give 50,000 to my mom and 50,000 to brother. I would give the money to them because I know how much they need it, they need it more than I do. My mom would be happy to take the money because of the college classes she's taking . I would give the money to my brother because he's the one of my family members who need it to pay off some high school things. My family would really appreciate the things that I would do for them and it wouldn't just make them happy, but it will make me happy as well.

My mom would need the money because she has classes at St.Josephs University and she would really have no problem paying for it if I haven't gave her the 50,000 dollars. My brother would need the money because he's in high school and he goes to Bishop McDevit and at that school there are lots of things he participate in and I just want to show respect and give him 50,000 dollars so he can pay for school supplies and soccer gear for him as well as get things for his team. I think giving money to my mom Colleen and my brother Grantley will really help them so they won't have to pay a lot for all of next season.

Tuesday, September 16, 2008

African Proverb #5

"The fool speaks, the wise person listens".

I think this means that a fool may speak and the wise person listen means to me that people always have lot's to say. I also think this means that fool may have bad and cruel things that he/she might be saying to the person who is listening. This is used in our every day life because lot's of people always say things that shouldn't be said at all and the person who is listening may get upset . There are times to speak and times when not to speak, that's what I think when it says a fool speak, and the wise person listen.

Thursday, September 11, 2008

Light Burst Tutorial


Step1: Set your foreground color to black. Type your text. Rasterize your your type layer. Put a selection around your text. Go under the select menu and choose save selection.

Step2: Deselect you type. Switch your foreground color to white. Under the Edit menu chose fill. Change the mode to multiply. Go under the filter menu, under blur, choose Gaussian blur. Enter 2.5 pixels.

Step3: Go under the filter menu, under stylize and choose Solarize. Press shift+Apple+L to run the Auto Level. Duplicate layer.
Step4: Filter menu, under distort, chose polar coordinates. Choose polar to rectangular.

Step5: Go under the image menu, under Rotate Canvas, choose 90ø cw. Invert you image( Apple+I). Filter menu, choose stylize, choose wind.

Step6: In t wind dialog box choose Wind for method and from the right for for direction. Run this filter 2 more times by pressing Apple+f twice.

Step7: Invert your image. Run auto levels. Run the wind filter 3 more times. Rotate canvas 90ø ccw. Filter menu, Distort, choose Polar Coordinates.

Step8: In Polar coordinates choose to Polar. Change the layer Blend Mode from normal to Screen.

Step9: Create new layer. Choose a gradient. Drag your Gradient through this layer. Change the Blend Mode Color Option Invert your layer.

Step10: Click on your text layer copy. Filter menu , under blur, choose, radial blur. In dialog box choose zoom. Increase the amout to 66. Click your original text layer. Select menu, load selection. Choose alpha 1. Change your foreground color to black. Deselect your text

African Proverb #4

"One camel does not laugh at another camel's hump."

I think this means a certain person who talks about other people and instead of saying it in front of that person he or she says it behind their back. this is a problem because some people talk about others but when someone talks about them they may get mad or upset. That's why I think it's not nice to talk about other people.

Tuesday, September 9, 2008

Perspective Type Tutorial


Step1: Choose your font. color and size
Step2: Type your word(s).
Step3: Go under the layer menu, uncer Type and choose convert to shape.
Step4:Hold down the apple key on the keyboard and tap the letter "T" to transform the text.
Step5: Hold down the control. Key and click the mouse. Choose perspectives. Grab one of the of the corner boxes and drag to create the perpective effect.
Step6:Under the layer menu, under rasterize choose shape.
Step7: Duplicate you text layer. Change your foreground color. Tap the question mark on your keyboard. Click option+delete to change the color.
Step8: Choose the middle layer and move it down to create a drop shadow effect using the down arrow.

Perspective Tutorial

Step1: Chosse your font, size and color.
Step2: Type your word.
Step3: In your layers palette, Apple+ click your type layer to put the "marching ants" around the text. Create a new layer.
Step4:Go under the select menu, under modify, and choose contract. WHEN the contract dialog appears, eneter 2 pixels, and click OK, then press Option+Delete to fill you contract section.
step5: Deselect by pressing Apple+D. Duplicate this lat=yer by dragging it to the New Layer Icon. Go under the filter menu, under blur and choose Gaussian Blur. When the dialog bow appears, enter 3 pixels, and click OK.
Step6: Choose Bevel and Emboss from the layer style menu at the bottom of the layers palette.
->Styles=Emboss
->Depth=300
->Size=12
->Highlight Opacity-40%
->Shadow Mode= Color Dodge
->Black Color swatch
Click OK
Step7: In the layers palette Click on the eye icon beside the background layer to hide it. Then choose merge visible from the palette drop down menu. Choose Drop Shadow from the Styles menu and click OK. Click on background layer to reveal it.

Friday, September 5, 2008

African Proverb 2

"Cross the river in a crowd and the crocodile won't eat you"
What does the proverb mean to you? How can you use it in your everyday life? Give an example.

I think this proverb means that  many people can't always do thing by their self. I also think this means that is can be sometimes better to do certain things at the same time because it can really help you. The problem ispeople think they can do everything  on their on but sometimes it just might be a good idea to work as a crowd so it may get done on time but not in a rush. For instance we may all need to work together but I was the one to do it on my own and everybody else gets done on time and I'm not done that's why I think it's a good idea to go as a crowd.

Thursday, September 4, 2008

African Proverb

"Knowledge is better than riches"
What does that African Proverb mean to you? How can it be used in your  everyday life? Give an example.

 I think "Knowledge is better than riches" mean to me that some time people may not learn as much in life . For instance sometimes people may not have the desire to at least try to learn something new or try to do well and  get a good education in life . The problem is when it sometimes come to education and knowledge people may think it's joke. I think this mean that riches only think of buying new things and only focus on that. That's what I think of "Knowledge is better than riches".

Wednesday, September 3, 2008

08-09 School Year

My goals for this school year is to achieve good grades and do the best I can to do all my work. I believe I did accomplish some goals like math, science, social studies and computer science. I accomplish my goals by doing all my work and studying as much as possible and listening to all assignments our teachers give us. I thinkwhat I did wrong was handing in homework late but when I knew how much points I lost I needed to step it up a little.

I think the benefit of attending New Media Technology is to learn as much as possible and to do well in all subject to get to the grade that the best for me. The weakest subject for me would be reading language arts because their were some difficulties I was having in that particular class. I feel that math was my strongest subject because it's very easy to get to know all the things our teacher was teaching us. I also think computer science was my strongest subject because it's very creative.